InfoSec
On Compelled Silence and Compelled Lies
If a canary song is heard, but no one verifies the source, are we safe or already compromised?
Someone on We2.ee asked me about the “warrant canary” I recently introduced there. What it’s good for, how it holds up legally, if canaries are more than just digital virtue signaling. It’s a sharp question, and one I wanted to explore thoroughly. So let’s dive into what warrant canaries are, their uncertain legal terrain, and why—and how—I chose to implement one anyway.

From Mineshafts to Mainframes
The term “warrant canary” originates in a familiar but grim coal mining practice. For generations, miners would carry caged canaries—small, famously sensitive songbirds—down into the shafts with them. The bird’s well-being was a constant, living indicator of air quality. As long as the canary sang, the air was safe. If it fell silent, it served as an urgent warning to GTFO before invisible toxic gases overwhelmed the miners, too.
A warrant canary is an attempt to apply this idiomatic concept in an entirely different context where the invisible threat isn’t carbon monoxide but a secret government order accompanied by a gag clause. The canary’s ‘song’, here, is a regularly published statement from a service provider asserting that no such orders have been received. Its sudden absence is the signal. But this elegant concept raises some thorny questions: can we trust a canary that continues to sing? And if it falls silent, what does that actually tell us?
A Clever Feint on Shaky Legal Ground
The entire legal theory of a warrant canary hinges on a frankly audacious distinction that has never been definitively tested in court. It operates in the grey area between the government's power to compel silence (via a gag order) and the First Amendment's protection against compelled speech.
Laws like the USA PATRIOT Act and the Foreign Intelligence Surveillance Act (FISA) grant government agencies the power to issue secret orders for data, like National Security Letters (NSLs). These often come with gag orders, making it a crime for the recipient to disclose the order's existence. That is compelled silence.
However, forcing a provider to continue publishing a statement they know to be false (e.g., "we have not received any NSLs") would be compelling them to lie. This is a form of compelled speech that would face much stricter constitutional scrutiny. The warrant canary is designed to exploit this gap. Rather than lie, the provider simply stops speaking.
But let's be clear: this is a high-stakes legal gamble.
A prosecutor would almost certainly argue that the sudden, deliberate silence is a form of communication intended to circumvent the gag order. And given this administration’s relentless assault on civil liberties, paired with a Supreme Court that has shown willingness to reconsider long-standing precedents, it is far from certain that a court would favor the canary's subtle logic over a government demand for total secrecy.
A provider who lets their canary expire isn't just signaling to their users; they are potentially volunteering to be the test case in a novel, expensive, and foundational legal battle they are not guaranteed to win.
Warrant Canaries in the Wild
With legal precarity as backdrop, three prominent cases demonstrate the challenges, the triumphs, and why precise design is everything when navigating such hostile territory.
Apple: The Canary, the Standoff, and the Long Game
The most famous and fiercely debated warrant canary incident is Apple's. To understand it, you have to remember the context: it was November 2013, the ink barely dry on the Snowden/PRISM revelations. Public trust in tech companies' ability to protect user data from government overreach was at an all-time low. In its very first transparency report, Apple made a bold claim:
“Apple has never received an order under Section 215 of the USA Patriot Act. We would expect to challenge such an order if served on us.”
For privacy advocates, this was a masterstroke. The implication was that if this sentence ever vanished, users should assume Apple had been served such an order and was legally gagged from saying so.
Then, in the very next report and all that would follow, the sentence was gone. Rampant speculation ensued. Had the canary worked, signaling a secret order? Or was it just a lawyerly rewording in response to new DOJ reporting guidelines? The ambiguity was the message, and no one outside Apple knows for sure.
Of course, Apple’s canary saga doesn't exist in a vacuum. It must be viewed as part of a bigger pivot toward user privacy under Tim Cook, memorialized in his 2014 statement of privacy as a fundamental human right. Just two years later, Apple’s commitment to user privacy faced an arguably much more meaningful test, in its famous 2015–2016 standoff with the FBI. The Bureau demanded Apple create a backdoor into the San Bernardino shooter's iPhone; Apple refused. Apple aced the test, moving the conversation from the fine print of a transparency report to the front page of every major newspaper.
RiseUp: Silence in Seattle Cements Concept
If the Apple story is about interpreting ambiguous signals from a corporate giant, the experience of the activist-focused tech collective RiseUp is about a canary serving its exact, intended purpose under immense pressure. In late 2016, the collective failed to update the warrant canary on their website.
The silence did not go unnoticed. For a user base of activists and organizers deeply attuned to such signals, the lapse was an immediate red flag. Commentators like William Gillis at the Center for Stateless Society quickly documented the "dead canary," correctly interpreting it as a near-certain sign that RiseUp had been served a secret government order with a gag clause. The system, at least as an alarm, had worked.
Months later, in February 2017, the collective was finally able to publish a statement explaining the situation. They had received two sealed FBI warrants, both accompanied by gag orders, related to an international DDoS extortion ring and a ransomware operation—criminal activities that violated their terms of service. Faced with the choice of perjuring themselves by issuing a false canary or facing contempt of court charges and likely incarceration, they chose the correct (and only legally viable) option: they said nothing and let the canary expire.
In their own words:
"The canary was so broad that any attempt to issue a new one would be a violation of a gag order... This is not desirable, because if any one of a number of minor things happen, it signals to users that a major thing has happened."
As a result, RiseUp changed their canary, making it narrower and more specific.
Cloudflare: Questions of Scale and the Plausibility of Perfection
The lessons from Apple's ambiguity and RiseUp's high-stakes test culminate in the Cloudflare approach: a masterclass in surgical precision. As one of the core infrastructure providers of the modern web, the promises they make carry enormous weight. Their canary isn't a single sentence in a report, but a specific list of substantive actions they have never taken.
Since at least 2019, their transparency reports have consistently included the following six attestations:
1. Cloudflare has never turned over our encryption or authentication keys or our customers' encryption or authentication keys to anyone.
2. Cloudflare has never installed any law enforcement software or equipment anywhere on our network.
3. Cloudflare has never provided any law enforcement organization a feed of our customers' content transiting our network.
4. Cloudflare has never modified customer content at the request of law enforcement or another party.
5. Cloudflare has never modified the intended destination of DNS responses at the request of law enforcement or another third party.
6. Cloudflare has never weakened, compromised, or subverted any of its encryption at the request of law enforcement or another third party.
Given this clarity, it was interesting to see the community concern that erupted on platforms like Hacker News in 2023 and early 2024. Vigilant users noticed that the date stamp on their transparency report page appeared to be stale, leading to speculation that one of these six promises had been broken. The situation highlighted the hair-trigger sensitivity of the community, and even prompted a response from Cloudflare's CEO, Matthew Prince, who noted the delay was likely an oversight.
This confusion appears to stem from a stale date on a webpage, not a change in the canary's substance. My own research confirms the six attestations above have remained consistent through every semi-annual report. As of this writing, their canary page is fully up-to-date and those same six attestations remain intact.
Far from being a failure, I see the Cloudflare case as a textbook example of a canary working as intended, albeit in a roundabout way. The precision of their statements leaves little room for misinterpretation, and the community's swift reaction to a perceived lapse—even one that turned out to be a clerical error—proves that people are watching. That vigilance is a non-negotiable component of any successful canary system.
And yet, one must acknowledge the extraordinary nature of Cloudflare's position. Given that they route roughly 20% of the entire web, the claim to have a perfect record against immense, constant state-level pressure is, to say the least, a remarkable one. This doesn't invalidate their canary; rather, it underscores why the community's vigilance is so important. For those who wish to monitor for themselves, Cloudflare helpfully provides an RSS feed for its transparency reports.
Words Are Very Necessary
So, after wading through the legal ambiguities and the real-world case studies, the question remains: is running a warrant canary a worthwhile endeavor, or just digital virtue signaling?
For me, it’s a yes—but only if it is a direct and thoughtful response to the lessons learned from those who came before:
- The attestations must be precise. As RiseUp learned, a broad canary is brittle. The We2.ee canary makes only four, narrowly-scoped promises focused on the most fundamental compromises: secret court orders, physical seizure, compelled surveillance modifications, and gag orders that would force a lie by omission.
- The proof must be verifiable and decentralized. As Apple’s ambiguity taught us, a canary needs a strong, public proof of life. Each We2.ee canary is time-stamped with a current news headline and a Monero block hash, then cryptographically signed with my PGP key.
- The process must be deliberate. A fully automated canary is worthless—a sophisticated adversary who compromises a server could simply let it keep running. My canary.py script gathers data but requires my manual review and GPG passphrase to sign and post the final message.
Of course, even this design has weaknesses. A missing canary is still ambiguous—it could mean a gagged order, but it could also mean I’m on vacation. It’s vulnerable if an adversary compromises not just the server, but my private PGP keys. As the Cloudflare case proves, it only works if people are actually watching.
are we safe or already compromised?
How to Verify the Canary
Step 1: Import My Public Key (One-time setup)
My public PGP key is the ultimate source of truth for my online identity. You can import it from the OpenPGP.org keyserver:
# Import the key from a public server
gpg --keyserver keys.openpgp.org --recv-keys '323A8A2C47B376224B3613B7535B265AEDBE5B44'

# Verify the fingerprint of the imported key
gpg --fingerprint [email protected]

# This should display: 323A 8A2C 47B3 7622 4B36 13B7 535B 265A EDBE 5B44
Step 2: Verify the Canary Message (Weekly check)
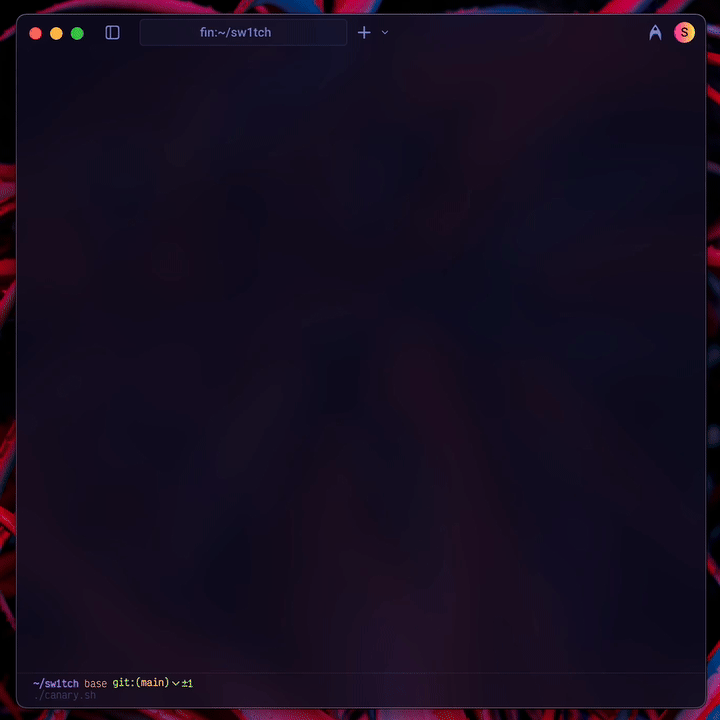
With my key imported, you can download the latest canary statement from the sw1tch repository and verify its cryptographic signature.
# Download the latest canary
curl -s https://sij.ai/sij/sw1tch/raw/branch/main/canary.txt > canary.txt

# Verify its signature
gpg --verify canary.txt
A successful check will show a Good signature from my key.
The Bottom Line
This all leads to a simple protocol: if the weekly canary in the #announcements:we2.ee room is more than three days late without a prior announcement, ping me. If there’s still radio silence, you should assume the canary's purpose has been triggered and act accordingly.
Ultimately, running a canary for We2.ee is not about digital virtue signaling. It is about transforming an abstract commitment to user privacy into a concrete, weekly, verifiable action. It is not a solution to state surveillance, but it is an alarm bell—and in a world of compelled silence, a reliable alarm bell is a powerful tool.

The free open source code for sw1tch, including the canary.py module, is available on my personal code hub.
we2.ee improvements
GDPR-compliant privacy policy, new logo, profile shortlinks, sliding sync, Element Web, Privatebin
I've been working today on some improvements to we2.ee, the end-to-end-encrypted messaging platform for the people.
Privacy Policy, GDPR, and Terms.
Privacy is really important to me, and I think it shows in our new GDPR-compliant privacy policy. Basically, we collect the minimum needed to run things, encrypt what we can, and try to be totally clear about how data is handled.
I've also added terms because, well, we need some ground rules. While I'm 100% committed to privacy and security, I won't let we2.ee become a place for harm. It's built to protect legitimate privacy interests - not enable abuse or harassment.
New (less problematic) Logo...
The original logo wasn't great. This one is much better:
Shorter Profile Links.
Here's something neat —we now have shorter profile links. If you use Matrix's matrix.to service, you'll know those URLs can get pretty long. Now you can just use:
- we2.ee/@user (for we2.ee accounts)
- we2.ee/@user:homeserver.net (for other Matrix accounts)
Either way, you'll get redirected to matrix.to/#/@user:homeserver.net. This saves 12 characters for we2.ee accounts compared to using matrix.to directly (or 16 characters compared to matrix.org!), and 5 characters for everyone else.
Pretty handy for fitting Matrix profiles into social media bios — especially on the fantastic X-destroying Bluesky (I'm @sij.law over there).
Matrix 2.0 and Sliding Sync.
Really excited about this one — we2.ee now supports sliding sync. It's a key feature of Matrix 2.0 that changes how clients fetch data. Instead of downloading everything at once, clients can just load what they need for what you're actually looking at. Makes everything snappier - login, launch, sync, you name it. Doesn't matter how many rooms you're in either.
This puts us firmly on the Matrix 2.0 roadmap alongside other major improvements like native OIDC authentication and group VoIP. If you're using modern clients like Element X, you'll notice everything feels much more responsive while keeping all the privacy benefits of decentralized, encrypted chat.
Element Web Right There.
we2.ee points to our Element Web instance, which I keep updated with the latest stable release. Element Web is the most full-featured Matrix client out there for browsers, and is a credible alternative to running a dedicated Matrix client. Having this, plus the Matrix homeserver, plus those profile links all on one super short domain is pretty great, if you ask me.
Say Hello to txt.we2.ee!
One last thing — I've set up txt.we2.ee for secure text sharing. It's powered by PrivateBin and works a lot like Pastebin, but with proper end-to-end encryption. Great for sharing code snippets or logs that you want to disappear after being read.
Upcoming we2.ee Roadmap:
- Coturn server for more reliable VoIP
- Jitsi Meet for videoconferencing
- Public Vaultwarden instance
- LDAP
- SIP gateway for telecom interoperability
That’s all for now—public lands legal work calls.
Cheers,
〄
we2.ee
encrypted chat for the people
Friends, I'm excited to announce the launch of we2.ee: a free, decentralized, end-to-end encrypted messaging platform that puts privacy first. we2.ee is built as a free-standing platform for everyone. Yes, everyone. End-to-end encrypted communications for all!
For the tech-savvy: we2.ee is a Matrix homeserver powered by Conduwuit and Element web.
For everyone else, you've got three easy ways to get started:
- Use your existing Matrix account via we2.ee
- Create a new we2.ee account (like
@yourname:we2.ee) and use it with any Matrix app (Element, Cinny, FluffyChat, etc.) - Do both - sign up, log in, and start sending encrypted messages to anyone on the Matrix network
If you're new to Matrix, it's an open protocol that's been battle-tested and security-audited, trusted by EU-member governments, sensitive NGOs, and privacy advocates alike. Think of it as a more secure and independent alternative to WhatsApp or Telegram, but one where you control your data.
we2.ee runs on dedicated servers in Tallinn, Estonia and Helsinki, Finland - both chosen for their vaunted privacy laws and green energy grid. Every message is end-to-end encrypted (that's the 'e2ee' in we2.ee), ensuring your conversations stay private.
Give it a try at we2.ee, even if some of this sounds like technical mumbo-jumbo. And feel free to tell me how you're using it—or don't, because that's kind of the whole point.
Cheers,
〄
AdGuard Home & Tailscale for maximal DNS privacy
DNS is a privacy minefield. Here's my best shot at charting a safe course through.
Regardless who you are, what devices you use, or how you connect to the internet, you use a domain name server (DNS) resolver. You may not know who your DNS resolver is, in which case your DNS and Internet Service Provider (ISP) are likely one-and-the-same, or you may at some point have set your device to use a third-party alternative, like 1.1.1.1 (Cloudflare) or 8.8.8.8 (Google). Regardless, if you're reading this, there's a strong likelihood that your DNS resolver knows who you are. Worse, your DNS resolver likely knows what you do—i.e., every site you visit. And it probably does stuff with that knowledge.
The good news? You can (and should) choose your DNS resolver(s). Heck, you can even be your own DNS resolver. Read on to learn why you might not want to go quite that far, and how I, for one, navigated the DNS privacy minefield.
Why start here?
When I launched this blog two months ago, I had a couple dozen ideas for topics to post about, and while this was one of them, it didn't top my list. But after two months running through the options and the reasons each might be the best starting point, I realized the obvious: it's more important to just start somewhere. And, at least as far as privacy is concerned, the subject of DNS may actually be a great place to start. After all, explaining my decision to build my own Linux server, or rely on Tailscale for connections between all my devices—both subjects of future posts—could ring a bit hollow without a shared understanding of DNS and the possibilities and vulnerabilities associated with it.
So... what is DNS?
DNS, in a nutshell, is the mechanism that ties each human-comprehensible domain (like sij.law) to a numeric IP address. Numeric IP addresses, in turn, are used to send and request content between your browser and a web server — like when you loaded this post, for instance.
It's helpful to think of DNS resolution as a rather tedious Q&A. When you try to load a page, like https://sij.law/dns, your browser asks your DNS resolver, "What's the IP address for sij.law?" Assuming no one else recently asked that same question (then it answers from memory), your DNS resolver starts a process something like this:
- Your DNS resolver queries one of the 13 root DNS servers—operated by various universities, U.S. and international agencies, and both nonprofit and for-profit corporations—"Who knows about
.lawdomains?" - The root server responds, "Ask the .law TLD servers at
a.nic.lawthroughz.nic.law." (TLD stands for Top-Level Domain) - Your DNS resolver then asks a .law TLD server, "Who knows about
sij.lawspecifically?" - The .law TLD server responds, "Ask Cloudflare's authoritative nameservers for
sij.lawatanuj.ns.cloudflare.comoringrid.ns.cloudflare.com." - Finally, your DNS resolver asks one of Cloudflare's authoritative nameservers, "What are the IP addresses for
sij.law?" - Cloudflare's authoritative nameserver responds with "
172.67.165.115and104.21.57.184" (which incidentally also belong to Cloudflare, because my site uses Cloudflare proxies for security).
Your DNS resolver then passes these IP addresses back to your browser.
... and? So what?
THE PROBLEM
DNS resolution works by you telling a resolver every time you want to load a site. Once your DNS resolver has done its job—translated a domain into an IP address that your browser can use to load content—you may just as soon be on your merry way to another page, forgetting all about how you got there. But your DNS resolver most certainly has not forgotten. Your DNS resolver probably keeps info about your browsing habits. And you really have no idea what it does with that information.
Are you... okay with that!?

I'm not. So I researched and trialed a number of options in my quest for genuine DNS privacy. Here are the options I considered, and why I didn't accept them as good enough.
Privacy-oriented DNS resolvers
I began my quest for the ultimate DNS privacy solution in an obvious place: privacy-oriented DNS resolvers. This category includes Quad9 — 9.9.9.9 and 149.112.112.112 (traditional DNS servers usually come in sets of two IP addresses for redundancy in case the first fails) — and Mullvad -- 194.242.2.2 and 2a07:e340::2 (the funky-looking second one is an IPv6 address, which is beyond the scope of this post, or—if we're being honest—any likely future post), among numerous others.
What sets these DNS resolvers apart from, say, Google, are generally good privacy policies (e.g. not keeping logs), backed by strong respective reputations in privacy and information security ("infosec") spaces. The reason I decided to look further, beyond simply punching in Quad9's or Mullvad's IPs in my systems' DNS settings, was two-fold:
First, DNS queries are typically made in unencrypted, plain-text form over port 53 to the DNS resolver. This means my ISP, and anyone else in a position to monitor my web traffic, can readily identify the sites I visit. For me, this was unacceptable.
Second, I adhere as faithfully as I can to a 'zero trust' approach to infosec, which can be summarized as "never trust, always verify." In practice this means configuring and exclusively using systems that don't depend on the trustworthiness of anyone besides myself and my closest / most trusted associates. Obviously, zero trust is often more aspirational than actually possible in absolute terms. But even if using the internet necessarily involves placing some degree of trust in others, I have deep qualms about trusting profit-driven companies to abide their privacy policies—especially when it comes to information as deeply personal as my complete browsing history. Quad9 and Mullvad both profess not to keep any logs of DNS queries, but users ultimately have to take them at their word. Nothing actually prevents them from keeping logs tying specific domains to specific users. For that matter, nothing inherently prevents resolvers like Quad9 and Mullvad from complying with requests from government actors to surveil users, independent of whether they themselves "keep" logs. For me, this too was unacceptable.
DNS-over-HTTPS, DNS-over-TLS
The obvious answer to the problem of all DNS queries being exposed to one's ISP (or eavesdroppers) is to use encrypted DNS, i.e., configuring one's devices to use DNS-over-HTTPS (DoH) or DNS-over-TLS (DoT).
Most operating systems—at least those with which I am most familiar (macOS, iOS, Debian Linux)—do not natively support DoH or DoT, but it's rather straightforward using third-party software I'll mention at the end.
While this approach prevents an ISP directly monitoring which sites you visit, it does not solve the distinct problem of having to trust your DNS resolver. They'll still know (a) who you are, and (b) what sites you visit.
Pi-hole & Unbound for self-hosted recursive DNS resolution?
Once I got this far into the murky depths of DNS, I encountered repeat mentions of a "pie hole". Turns out they meant Pi-hole. It's free open-source ("FOSS" henceforth) DNS software that's actively developed by a large community of developers. Turns out Pi-hole is pretty great at a lot of things, like network-wide ad- or content-blocking with user-specific rulesets, and—more relevant here—acting as one's own recursive caching DNS resolver by pairing it with Unbound (also FOSS).
"What the ƒ#@% is a recursive caching DNS resolver!?" I hear you ask?
Recall the tedious Q&A we outlined. A recursive caching DNS resolver, like Pi-hole with Unbound, performs this entire Q&A process itself, starting from the root and working its way down. It then remembers the answer for a while, so it can respond more quickly to future questions about sij.law without having to ask everyone all over again.
This approach has significant pros & cons:
- Pros: you're not relying on any third-party DNS resolver. You're querying the authoritative sources directly and caching the results yourself. This eliminates the privacy concerns associated with trusting one DNS resolver with all your queries. You're also positioned to implement industrial strength ad-blocking or web-filtering rules for your entire network.
- Cons: authoritative DNS servers do not accept encrypted DNS queries. Let me repeat that, because too often this caveat isn't acknowledged in DNS privacy discourse that seems to favor Pi-hole + Unbound. Authoritative DNS servers. DO. NOT. ACCEPT. encrypted DNS queries. All DNS queries to authoritative DNS servers are made in UNENCRYPTED, PLAIN-TEXT form. This puts us back to square one with our ISP (and anyone else listening in) able to easily monitor every site we visit.
The astute reader will now ask: if all DNS queries are ultimately decrypted and sent over the open internet to authoritative DNS servers in plain text anyway, what's the point of encrypted DNS anyway? What's the point of any of this?

Well, the problem with being your own recursive caching DNS resolver is that all DNS queries you make are presumptively your own. Your ISP knows, the authoritative DNS servers knows, and anyone else listening in also knows—they know it's you.
By contrast, when you use a DNS resolver like Mullvad or Quad9 over encrypted DNS, your ISP doesn't know what you're doing, and while the DNS resolver's ISP and the authoritative DNS can see you what you're doing, they don't know who you are. All they see is a firehose of undifferentiated DNS queries going through a major DNS resolver, each presumptively from anyone anywhere in the world.

Think of it like digital black bloc—anonymity in a faceless crowd.
But as we already discussed, that approach entails a critical vulnerability: placing trust in a single DNS resolver (to strain the metaphor a tad: the black bloc clothing shop), which does know both (1) who you are, and (2) what you are doing.
A SOLUTION
By now, it became evident to me that there's no such thing as absolute DNS privacy and anonymity. The best you can do is:
- Conceal what you are doing from anyone that knows who you are,
- Conceal who you are from anyone that knows what you are doing, and
- Conceal the fact that your DNS queries all come from one source, even if that source is anonymous per #2.
I knew all three measures are independently possible, so the challenge became to achieve them together. Cue—
AdGuard Home
AdGuard Home, like Pi-hole, is FOSS you can install on a small at-home server (think Raspberry Pi, old MacBook, or Intel NUC), or a cheap Virtual Private Server (VPS), which handles DNS for your entire network. Like Pi-hole, it offers network-wide ad-blocking and custom filtering rules. But AdGuard Home comes with key DNS privacy functionality that Pi-hole doesn't:
- Built-in support for DNSCrypt: AdGuard Home natively supports DNSCrypt between itself and the upstream DNS server(s). This ensures your DNS queries are encrypted all the way to your upstream servers, concealing what you're doing from your AdGuard Home's ISP (which will typically know who you are) while also ensuring your upstream servers are who they purport to be—not imposters.
- Multiple upstream resolvers: AdGuard Home allows you to enter a list of upstream DNS resolvers and will rotate through them all, dividing your queries between multiple servers in multiple jurisdictions. This prevents any single resolver/authority building a complete profile of what you do, which could be used to infer with substantial certainty who you are.
- Built-in support for DoH and DoT: AdGuard Home natively supports DNS-over-HTTPS (DoH) and DNS-over-TLS (DoT) between your devices and AdGuard Home. These encryption protocols conceal what you are doing from your devices' ISPs and any other eavesdroppers between your devices that already know who you are.
Of course, without more, individual upstream DNS servers you select still know who you are. That brings us to—
Tailscale
Tailscale is an incredibly useful tool that essentially creates a virtual private network (VPN) between your devices, allowing you to access services on any one from any other, anywhere in the world.
Tailscale is free for personal use on up to 100 devices (more than most households will ever need), and offers extremely competitive pricing for business use.
Tailscale offers three key functionalities relevant here:
- Tailscale secures all traffic between your devices using the ironclad
wireguardend-to-end-encryption (E2EE) protocol. This is a privacy boon for any number of use cases, but most relevant here, it ensures DNS queries from any devices that can't natively configure DoH or DoT are nevertheless encrypted from that device to your AdGuard Home server. - Tailscale allows you to force your devices to all use the DNS service you specify. While some router's firmware lets you direct all DNS queries to a particular server over DoH or DoT, (a) not all do, and (b) you likely access the internet from a mobile device from time-to-time over other networks where your router isn't relevant. When you put your AdGuard Home server on the same Tailscale network ('tailnet') as your devices, you allow those devices to rely on AdGuard Home for DNS queries from anywhere in the world.
- Tailscale has a partnership with Mullvad to add privacy VPN functionality to any tailnet. You've likely heard of privacy VPNs—other noteworthy options include ProtonVPN, NordVPN, and WindScribe. What these all have in common is they will route your internet traffic over an encrypted tunnel to an 'exit node' somewhere in the world, concealing who you are from the sites you visit—and anyone else who can see what you are doing. Privacy VPNs aren't typically free, and the Mullvad extension for Tailscale is no exception. But at $5/mo for up to 5 devices, it's very competitively priced.
SETTING IT UP
- Choose a server for AdGuard Home
You can run AdGuard Home on macOS, Windows, Linux, or more specialized OSs like Raspberry Pi or TrueNAS SCALE. It doesn't matter much which device or operating system you choose, except that it should be 'high availability'—online and accessible 24/7—if you intend to use it for DNS resolution on other devices. You could install it on your laptop and use it effectively on that laptop, but your smartphone couldn't use it when your laptop is out of juice or asleep in a bag.
In future posts I'll discuss my home servers and the dedicated Debian server I rent at a Finnish datacenter. Without going into the specifics of selecting or building one just yet, I do recommend using a server for AdGuard Home. Servers are typically higher availability than end user computers, making them more suitable for multi-device setups.

Finally, if you intend to enable DoH, I recommend running AdGuard Home on the same server as Caddy so it can share access to the HTTPS certificates that Caddy automatically renews.
- Install and configure Tailscale on the server (and the device you're using to access it, if separate).
Tailscale is straightforward to setup, but first you'll need an account. A free one will work, but please make sure you're in compliance with Tailscale's policies for free vs. business accounts.
Once you've created a Tailscale account, install Tailscale on the same server that will run AdGuard Home, and if it's not the computer you're using to access it, install Tailscale on the local device too.
You can snag Tailscale on the macOS and iOS app stores. For Linux servers including Debian, Tailscale has wizard for creating an installation script. Windows and Android users are on their own (fair warning: my readers will see this a lot), but I suspect it's similarly straightforward to install there too.
Take note of your server's Tailscale IP address—it'll begin with 100.
100.64.64, with routers occupying the .1–9 range, servers occupying the .10–.19 range, my own devices occupying the .20–.49 range, and family members' devices occupying the .50–.99 range. This makes it easier to remember the IPs of specific devices and to know what type of device an IP belongs to even if I don't immediately recall which specific device it is.- Install AdGuard Home
The steps for installing AdGuard Home will depend on the device you're using, so please see the official documentation for other device-specific instructions. To install AdGuard Home on Debian:
curl -s -S -L https://raw.githubusercontent.com/AdguardTeam/AdGuardHome/master/scripts/install.sh | sudo sh -s -- -v

sudo /opt/AdGuardHome/AdGuardHome -s start
Standard method for installing and starting AdGuard Home on Linux
- Initial AdGuard Home configuration
Open a new browser tab, navigate to http://Your-Tailscale-IP:3000, and begin the initial 5-step configuration.
On the second step, I recommend setting the listen interface for both the Admin Web Interface and the DNS Server to your Tailscale IP address, to ensure only devices you've added and authorized on Tailscale can access it directly. You'll also need to select a different port than the default of 80 if you intend to run Caddy on the same server (as I recommend if you're looking to configure DoH), or if you're running another reverse proxy or web server. I've adopted port 8052 for this purpose.
Be sure to create a very secure password on the third step.
Once you've completed the initial configuration, visit http://Your-Tailscale-IP:Admin-Web-Interface-Port. For me, for example, that is http://100.64.64.11:8052. Login with the credentials you just created.
- Add upstream DNS resolvers to AdGuard Home
You should now be greeted by the AdGuard Home admin panel. Click Settings > DNS settings, and you should see a field for entering a list of Upstream DNS servers. I recommend finding upstream DNS resolvers to use on DNSCrypt.info, or directly from this GitHub file.
I won't share my upstream resolvers because that would somewhat defeat my own DNS privacy, but I can share some tips for choosing your upstream resolvers:
- Choose servers that support DNSCrypt and DNSSEC to ensure your DNS queries aren't tampered with.
- Choose servers that profess not to keep logs.
- Avoid servers that apply ad-blocking or filtering rules. If you want this functionality it's best to set it up yourself within AdGuard Home rather than relying on rules set on an upstream server outside your control.
- Choose a healthy mix of servers around the world, but especially in your region to ensure fast DNS responses.
- Choose a few servers from established privacy or infosec companies like Mullvad, Njalla, and Quad9. These will typically have the infrastructure to fulfill your DNS requests quickly and strong privacy policies, and are less likely to become defunct (which many servers listed on DNSCrypt.info seem to).
- Rely on the
sdns://DNS stamp method of adding servers. These "stamps" encode all the information needed to connect to a DNS server, much like QR codes, streamlining the process. - Add a comment above each server in your list so you remember what/where it is.
- Aim for around a dozen servers. The more you have, the smaller the proportion of your total DNS queries any one server will have, boosting your DNS privacy. On the other hand, the more you have, the more likely you are to select one that becomes defunct.
- Scroll down and click
Test upstreamsafter adding each server, so you immediately know if it's defunct. Replace the last server you added if the test ever fails.
- Configure the remaining DNS settings on AdGuard Home
Once you've added a dozen or so upstream DNS resolvers that test successfully, there are a few more settings on the same page (DNS Settings):
- Select
Load-balancing. - Add one or more
Fallback DNS servers. You can get these from the same list as the primary upstream DNS servers discussed above, and use the same syntax (including the recommendedsdns://DNS stamp method). I recommend using established DNS privacy providers like Mullvad, Njalla, or Quad9 here. - Add one or more
Bootstrap DNS servers. Here you need to enter traditional IP addresses. I use Quad9 and Mullvad for this, so I've entered9.9.9.9,149.112.112.112, and149.112.112.10. - Again
Test upstreamsto ensure everything here is copacetic. - Scroll further down and
Enable EDNS client subnet. - For privacy reasons (which is why we're here after all), you should also
Use custom IP for EDNS. The IP you enter here may affect how quickly your DNS queries are answered, so it's a good idea to select the IP of an institution near you—e.g. a university, library, or hospital. For example, if you live in Michigan, you could rundig umich.eduand enter the resulting IP address. Enable DNSSEC.- Set the
Cache sizeto a higher value, e.g., 67108864 bytes (64 megabytes). - Enable
Optimistic caching. This will result in fewer DNS queries reaching your upstream servers, enhancing your privacy and speeding up DNS resolution—possibly dramatically. The drawback—the occasional invalid DNS response the first time after a site's DNS has changed (rare)—is well worth the benefit. - Under
Allowed clients, enter127.0.0.1, and the narrowest CIDR range that encompasses all your Tailscale IPs. For me, that's100.64.64.0/24.
- Configure Tailscale to enforce AdGuard Home as the only DNS for your tailnet
Return to the Tailscale admin console and navigate to the DNS tab. Scroll down to Nameservers and remove any that may be listed under Global nameservers.
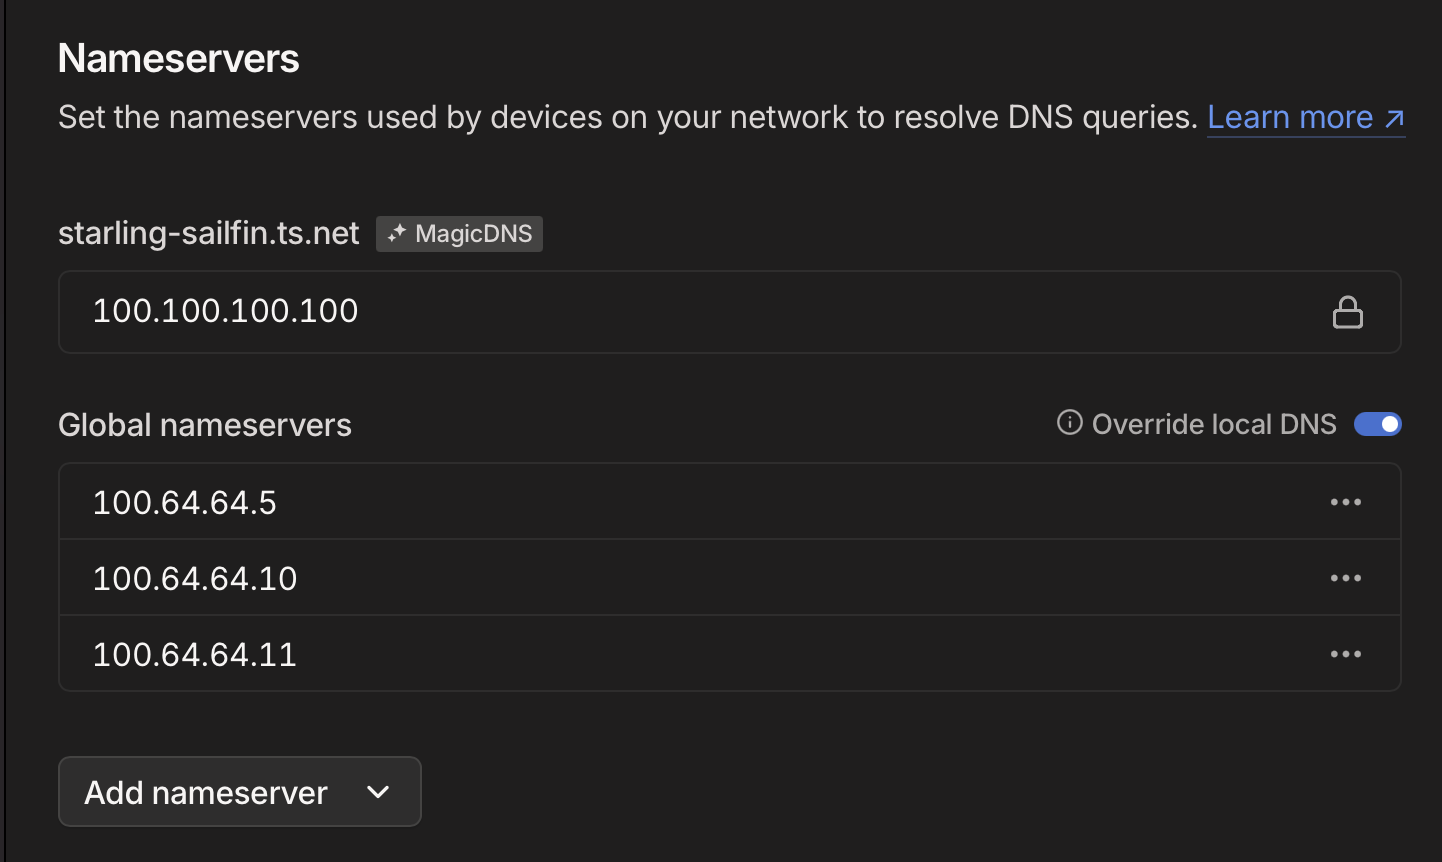
Here, add the Tailscale IP address of your AdGuard Home server, and enable Override local DNS.
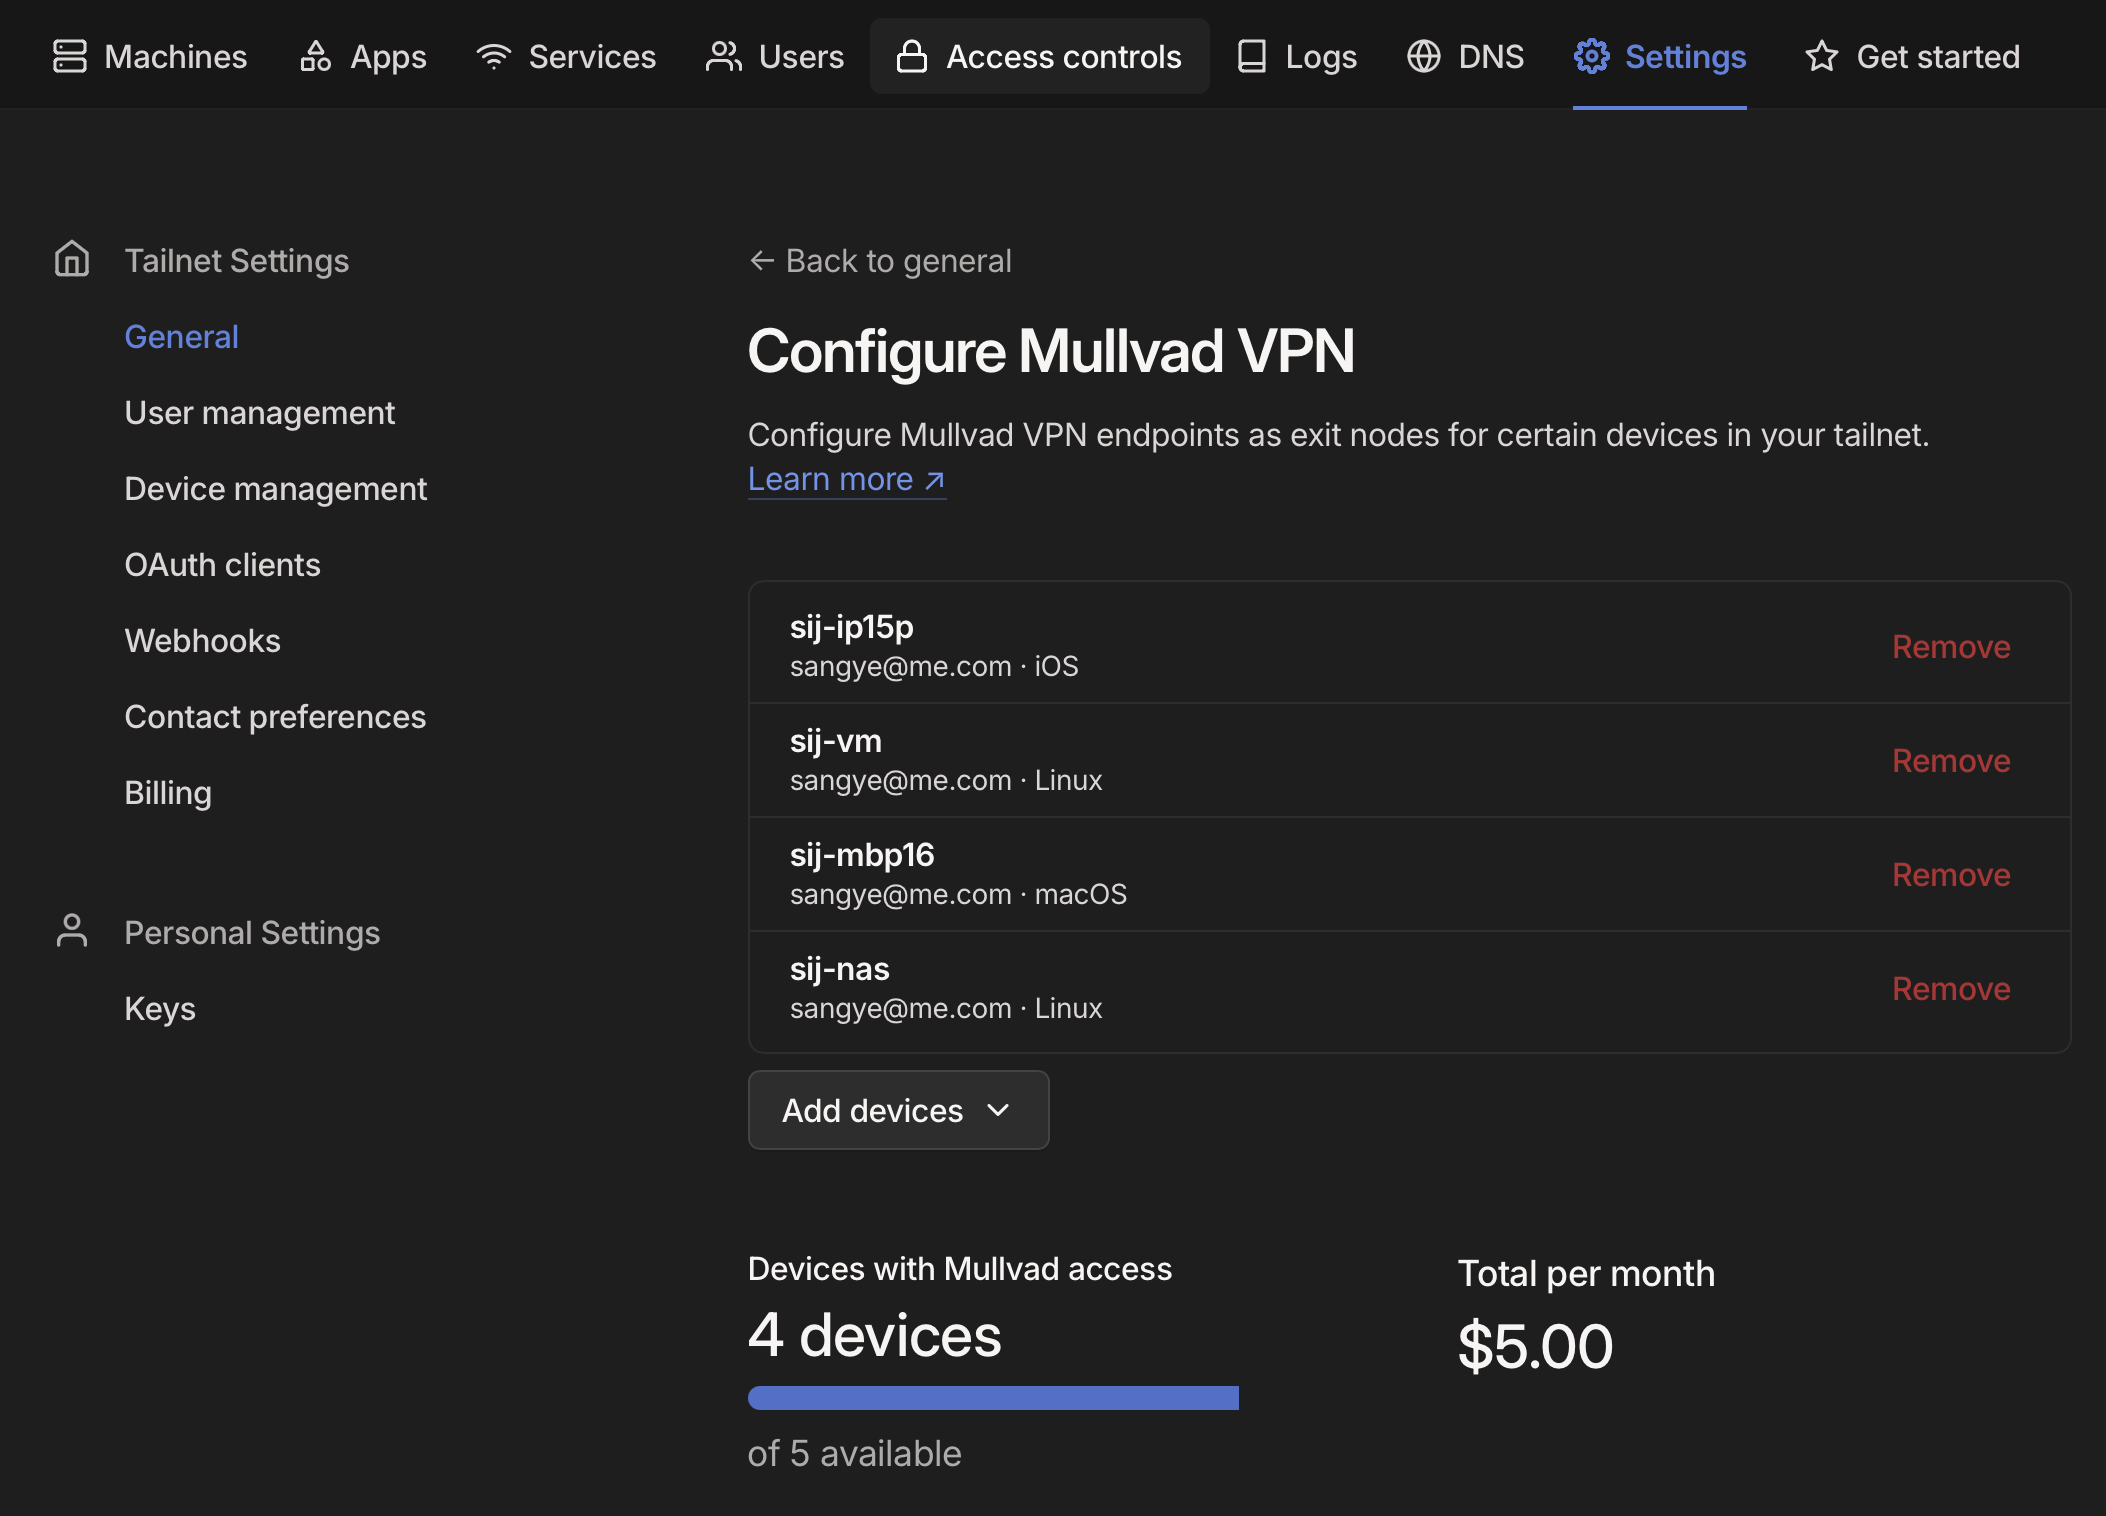
- Semi-Optional: Enable Mullvad on your AdGuard Home server
Still on the Tailscale admin console, navigate to the Settings tab, find the section for Mullvad VPN, and click Configure. Purchase the add-on for $5/month, then add the AdGuard Home server to the list of devices authorized to use Mullvad exit nodes.
On your AdGuard Home server, set Tailscale to connect to a Mullvad exit node. On Debian: tailscale exit-node list; find one in a privacy-friendly jurisdiction like Switzerland, Sweden, or Finland; then tailscale set --exit-node-allow-lan-access --accept-dns=true --exit-node=Hostname-or-IP-address-of-Mullvad-exit-node.
- Optional: Set up blocklists for ads, malware, etc.
If you've gotten this far, AdGuard Home is uniquely well positioned to block ads across your entire network—before they ever reach your browsers' own ad-blocker. It's why this powerful multi-purpose software is called 'AdGuard', after all. If you want to take advantage of this core functionality—which you absolutely should—navigate to Filters -> DNS Blocklists -> Add blocklist.
Here you can either choose from a great assortment of blocklists that come with AdGuard Home by default, or add your own. I've not tested the options extensively, but have had good results enabling the following:
- AdGuard DNS Filter
- AdAway Default Blocklist
- Malicious URL Blocklist (URLHaus)
- Dan Pollock's List
- 1Hosts (Lite)
- Dandelion Sprout's Anti-Malware List
- Steven Black's List
- HaGeZi's Pro Blocklist
- OISD Blocklist Small
- Peter Lowe's Blocklist
- Optional: Set up a DNS rewrite rule to easily tell if you're using AdGuard Home
DNS hijacking is a thing, and while the methods detailed here (in particular Tailscale and DNSSEC) should prevent that occurring, you can easily set up a simple DNS rewrite rule that will prove you're using AdGuard Home and not an imposter, for your continued peace of mind.
On the AdGuard Home admin panel, navigate to Filters -> DNS Rewrites -> Add DNS Rewrite, enter a made-up domain like adguard.dns.rewrite, and point it to your Caddy IP address or to another domain. Then, when you visit http://adguard.dns.rewrite, you'll know you're using AdGuard Home if your browser takes you to the location you've configured.
- Optional: Set up DoH and configure Caddy
The instructions I'll provide here may not be compatible with Mullvad exit nodes depending on your setup. It works for me, but this configuration is stretching the limits of my know-how (I know just enough to know things could get squirrelly here depending on firewall rules, Tailscale ACLs, etc). If a reader can provide a more confident explanation of this setup, that would be lovely.
This step has some prerequisites that I might cover in a future post but for now are beyond the scope:
- You need to have installed Caddy on the same server as AdGuard Home and configure it to use Cloudflare for HTTPS challenges.
- The server with Caddy and AdGuard home on it needs to have a permanent IP address. You need to own a subdomain (e.g.
dns.sij.law) and assign it to this IP address.
Edit your Caddyfile — typically it's at /etc/caddy/Caddyfile —
sudo nano /etc/caddy/Caddyfile
You will want to make sure your email address is included in it, for HTTPS certificate acquisition. Then add an entry for AdGuard Home.
{
	log {
		output stdout
		format console
		level DEBUG
	}

	admin 127.0.0.1:2019

	servers {
		metrics
	}

	# replace with your email address
	email [email protected]

	acme_ca https://acme.zerossl.com/v2/DV90
}

# replace this with a subdomain you've pointed to your server's public IP address
dns.sij.law {
        tls {
                dns cloudflare {env.CLOUDFLARE_API_TOKEN}
        }

        @doh {
                path /dns-query
                header Accept application/dns-message
        }

        handle @doh {
                reverse_proxy https://localhost:8053 {
                        transport http {
                                tls_insecure_skip_verify
                        }
                }
        }

        handle {
                reverse_proxy http://localhost:8052
        }

        log {
                output file /var/log/caddy/dns.sij.law.log
                format json
        }
}
Your Caddyfile might look something like this.
Save it (Ctrl+O), exit Nano (Ctrl+X), then restart Caddy:
sudo systemctl restart caddy
Navigate back to the AdGuard Home admin panel, then Settings -> Encryption settings:
Enable Encryption (HTTPS, DNS-over-HTTPS, and DNS-over-TLS.- Leave
Enable plain DNSon for standard DNS over Tailscale. - Set
Server nameto the subdomain you added to Caddy. - Do not enable
Redirect to HTTPS automatically. - Set the HTTPS port to
8053and the DNS-over-TLS port to8054. - Under Certificates,
Set a certificates file pathandSet a private key file.You'll need to find where Caddy saved these files on your local filesystem. For me, these file paths are:/var/lib/caddy/.local/share/caddy/certificates/acme.zerossl.com-v2-dv90/dns.sij.law/dns.sij.law.crt/var/lib/caddy/.local/share/caddy/certificates/acme.zerossl.com-v2-dv90/dns.sij.law/dns.sij.law.key
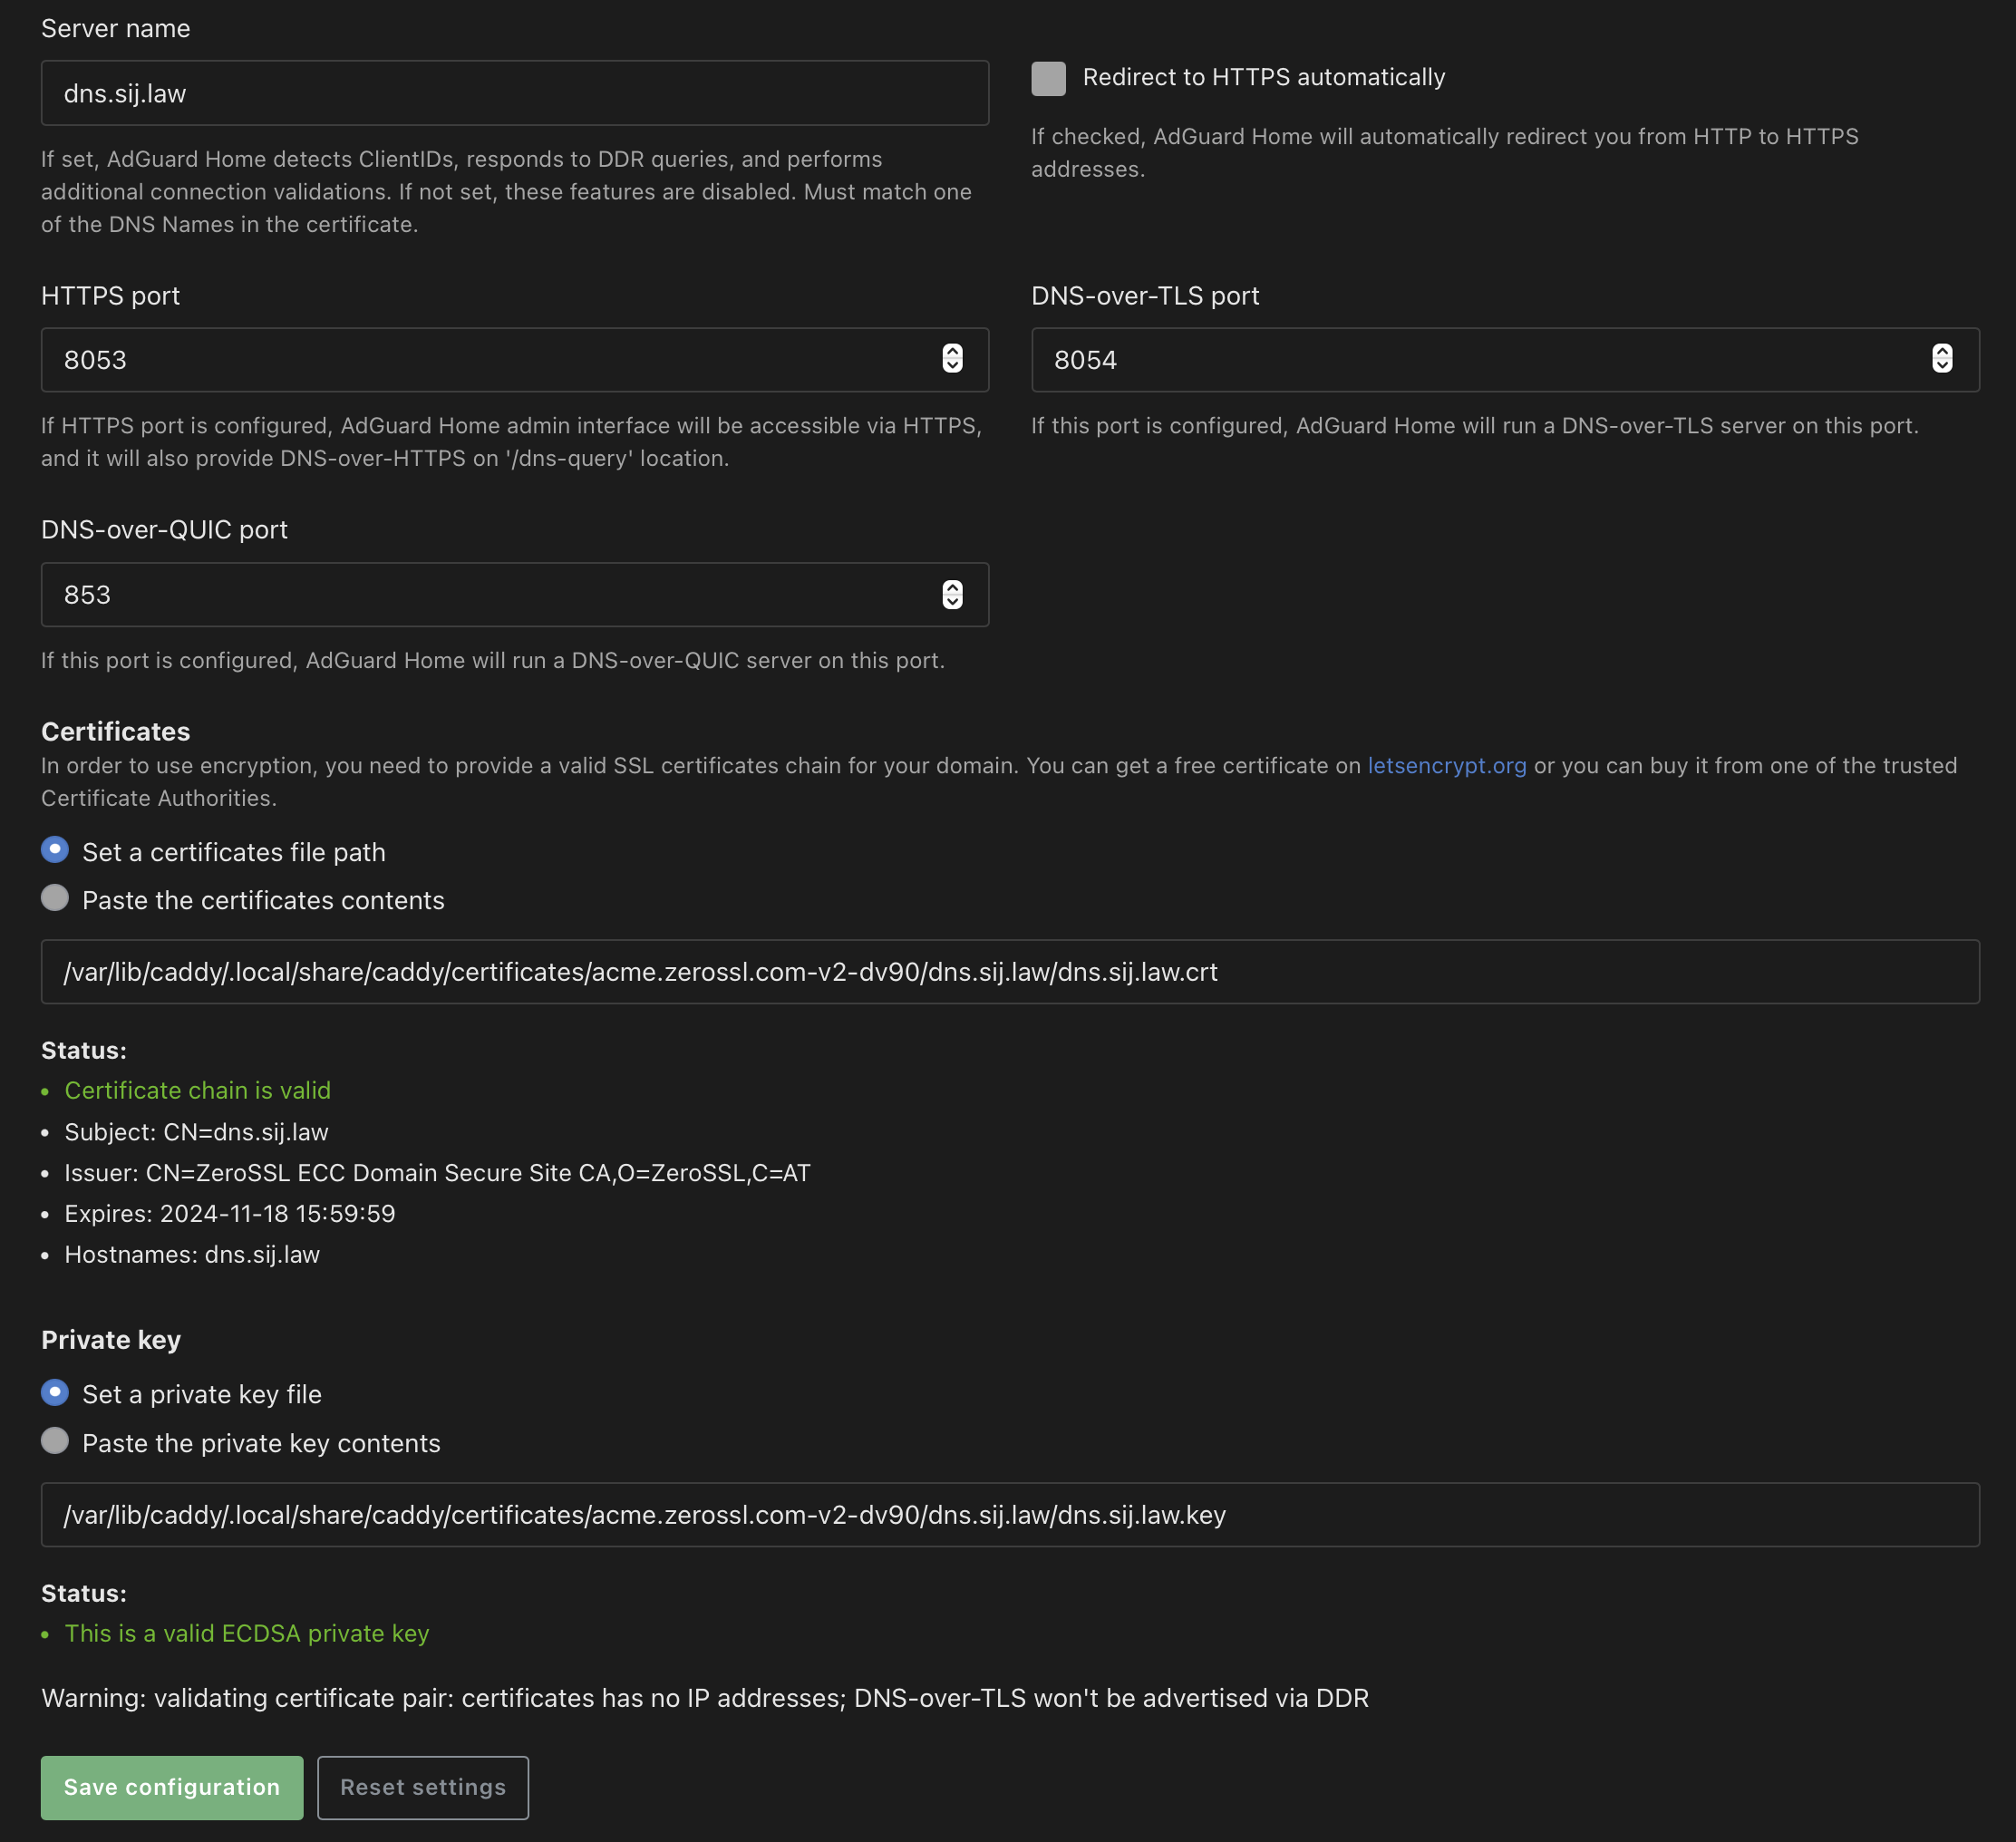
- Once you've entered your certificate and private key file paths, ensure the certificate chain and the private key are recognized as valid.
- Save the settings.
AdGuard Home should now answer DoH requests at the subdomain you configured for it.
Depending on your device's operating system there are various apps and tools you can use to enforce DoH locally. These include:Little Snitch 6 (macOS), DNS Override (iOS and iPadOS).
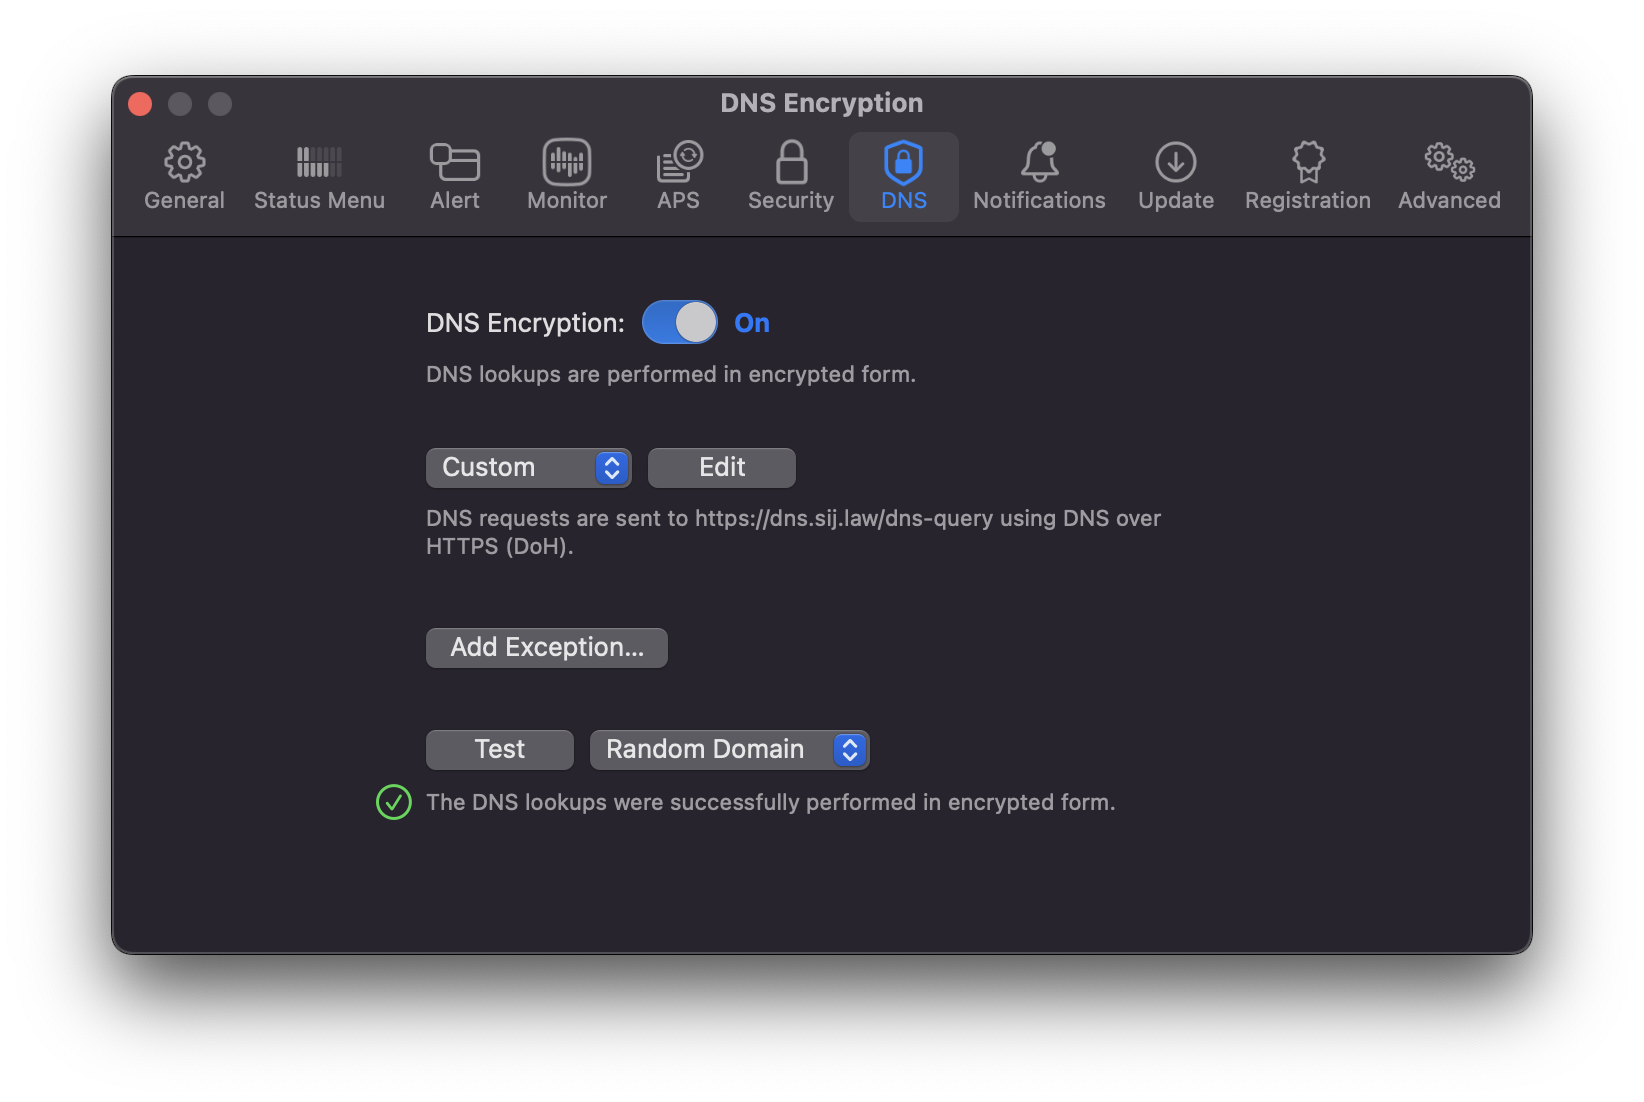
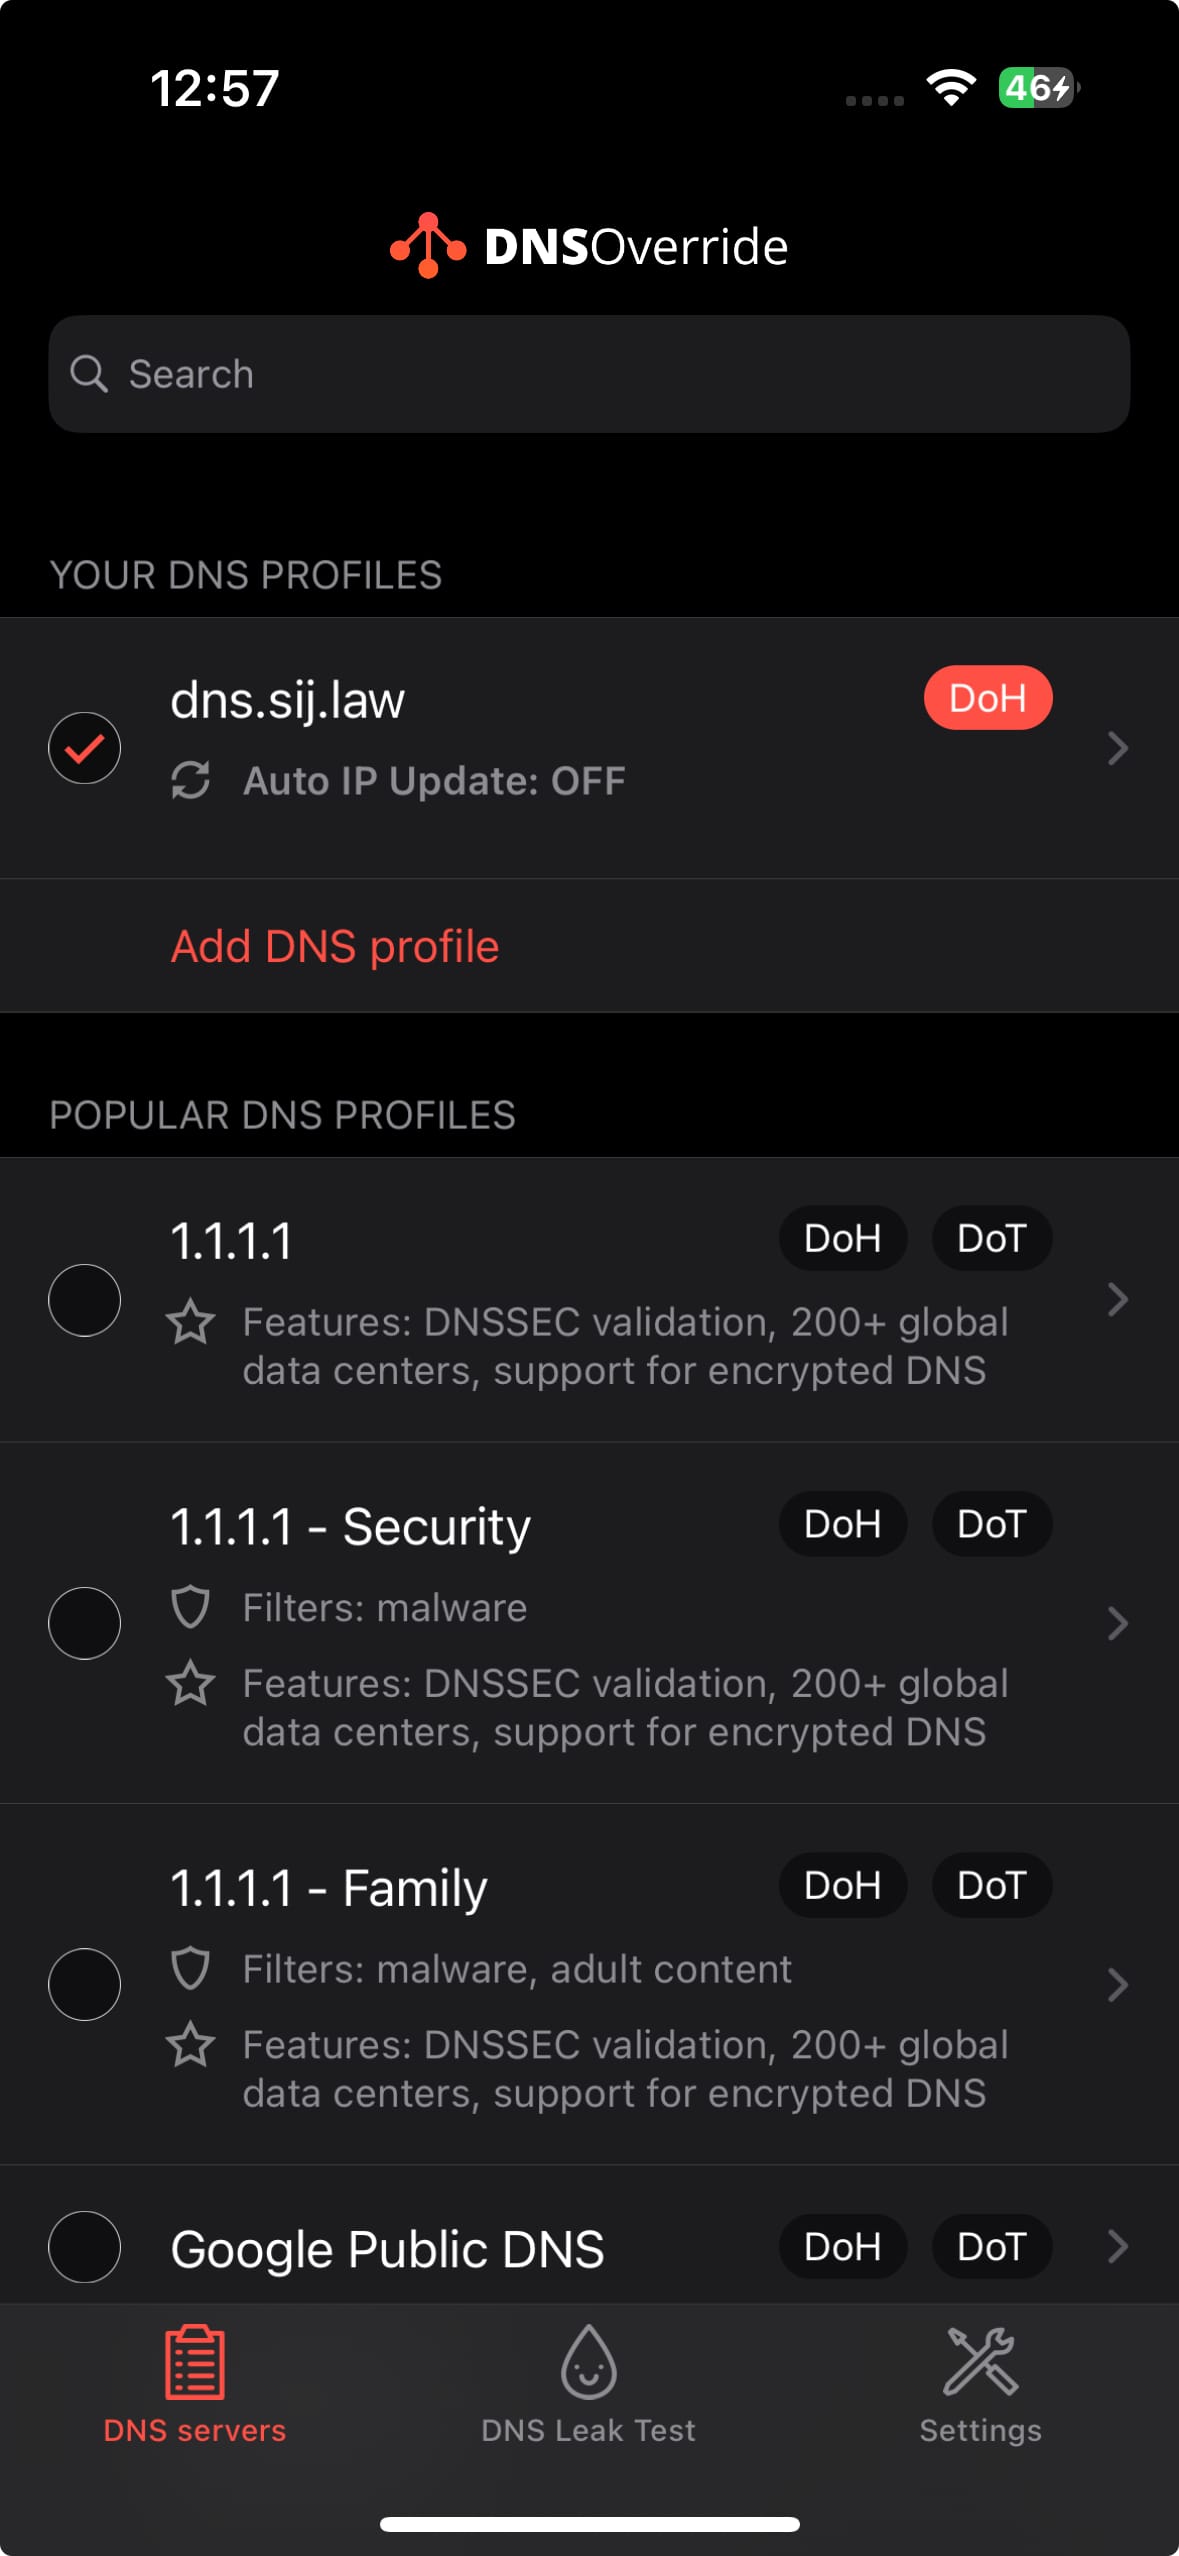
Adding my own DoH server to Little Snitch 6 (macOS) and DNS Override (iOS)
Alright folks, that'll do it for now. Let me know in the comments your approach to DNS privacy, if you're going to try (or already use) something along these lines, and if you'd like to see more privacy-oriented deep dives on this blog.
Cheers,
〄